Connect Hue to Oracle with Client Package
To connect to an Oracle database, Hue needs Oracle client libraries (Basic and SDK). These are available from Oracle as packages (zip files) or from Cloudera as a parcel (for CDH parcel deployments).
This page covers connecting with Oracle client packages.
Install and Configure Oracle Server
Set Environment Variables
- Set all necessary Oracle environment variables. For example:
## Example Environment Variables VERSION=12.1.0.2 ORACLE_HOSTNAME=<your hostname> ORACLE_BASE=/ora01/app/oracle/product/base ORACLE_HOME=${ORACLE_BASE}/${VERSION} ORACLE_SID=orcl ORAOWNER_BIN=/home/oracle/bin LD_LIBRARY_PATH=${ORACLE_HOME}/lib:${LD_LIBRARY_PATH} - Ensure that your shell .profile resembles:
## Example from /home/oracle/.bash_profile
TMP=/tmp
ORACLE_HOSTNAME=<your hostname>
ORACLE_BASE=/ora01/app/oracle/product/base
ORACLE_HOME=/ora01/app/oracle/product/base/12.1.0.2
ORACLE_SID=orcl
ORAOWNER_BIN=/home/oracle/bin
LD_LIBRARY_PATH=${ORACLE_HOME}/lib:${LD_LIBRARY_PATH}
PATH=${ORACLE_HOME}/bin:${ORAOWNER_BIN}:${PATH}
CLASSPATH=${ORACLE_HOME}/jlib:${ORACLE_HOME}/rdbms/jlib;
export ORACLE_HOSTNAME ORACLE_BASE ORACLE_HOME ORACLE_SID LD_LIBRARY_PATH PATH CLASSPATH TMP
Configure Character Set
- Log on as the oracle user:
su - oracle
- Start the listener control (as user oracle):
$ORACLE_HOME/bin/lsnrctl start
- Log on to SQL*Plus:
sqlplus / as sysdba
- Ensure character set is AL32UTF8 and national character set is UTF8:
SELECT * FROM v$nls_parameters where parameter like '%CHARACTERSET';
To update, quit the shell and run these commands in a SQL*Plus script:
vi alter_charset.ddl
## Save in alter_charset.ddl (script takes 2-3 minutes)
CONNECT / as sysdba
SHUTDOWN immediate
STARTUP mount
ALTER SYSTEM ENABLE RESTRICTED SESSION;
ALTER SYSTEM SET JOB_QUEUE_PROCESSES=0 SCOPE = MEMORY;
ALTER SYSTEM SET AQ_TM_PROCESSES=0 SCOPE = MEMORY;
ALTER DATABASE OPEN;
ALTER DATABASE CHARACTER SET AL32UTF8;
ALTER DATABASE NATIONAL CHARACTER SET INTERNAL_USE UTF8;
SHUTDOWN immediate
STARTUP
sqlplus /nolog < alter_charset.ddl
Create Hue Database
- Create the hue schema, set quotas, and grant select permissions (do not grant all):
vi create_hue_database.ddl
## Save in create_hue_database.ddl
## Change huepassword to something more secure
CONNECT / as sysdba
ALTER session set "_ORACLE_SCRIPT"=true;

DROP user hue cascade;
CREATE user hue identified by huepassword;
ALTER user hue quota 1000m on users;
ALTER user hue quota 100m on system;
GRANT create sequence to hue;
GRANT create session to hue;
GRANT create table to hue;
GRANT create view to hue;
GRANT create procedure to hue;
GRANT create trigger to hue;
GRANT execute on sys.dbms_crypto to hue;
GRANT execute on sys.dbms_lob to hue;
sqlplus /nolog < create_hue_database.ddl
- Verify that you can connect to hue:
sqlplus hue/<your hue password>
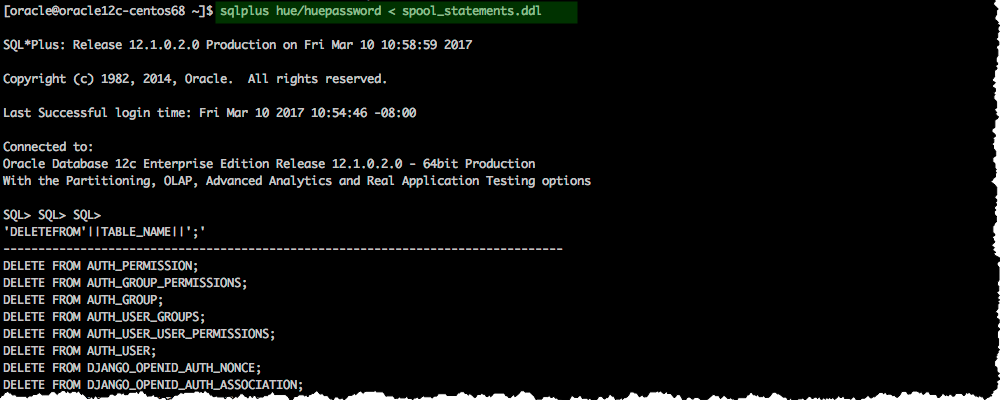
- Clean all hue user tables. Create a script to spool delete statements into a new file, delete_from_tables.ddl:
vi spool_statements.ddl
## Save in spool_statements.ddl (which generates delete_from_tables.ddl)
spool delete_from_tables.ddl
set pagesize 100;
SELECT 'DELETE FROM ' || table_name || ';' FROM user_tables;
commit;
spool off
quit
## Create delete_from_tables.ddl
sqlplus hue/<your hue password> < spool_statements.ddl

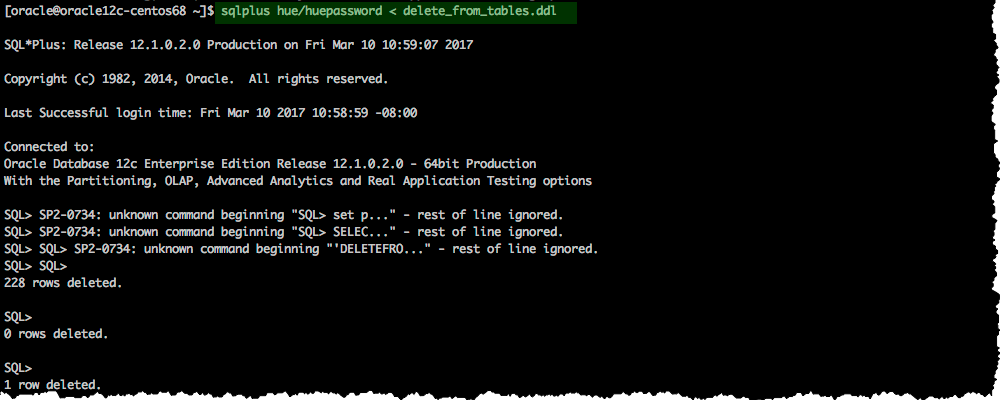
## Run delete_from_tables.ddl
sqlplus hue/<your hue password> < delete_from_tables.ddl


Install Oracle Client Package
Install Asynchronous I/O Library
- Log on to the host of Cloudera Manager server.
- Install the Asynchronous I/O library, libaio/libaio1:
## CentOS/RHEL (yum), SLES (zypper), Ubuntu/Debian (apt-get)
sudo yum install -y libaio
#sudo zypper install -y libaio
#sudo apt-get install -y libaio1
Install Oracle Client
- Download zip files for Instant Client Package, Basic and SDK (with headers).
- For this step, switch to the host with the downloaded files and upload zip to the Cloudera Manager server host:
scp instantclient-*.zip root@<CM server hostname>:.

- Arrange the client libraries to mirror the tree structure in the image. Here is one way to do this:
# Create nested directories: /usr/share/oracle/instantclient/lib/
mkdir -pm 755 /usr/share/oracle/instantclient/lib

# Unzip. The files expand into /usr/share/oracle/instantclient/instantclient_<ver>/
unzip '*.zip' -d /usr/share/oracle/instantclient/

# Move lib files from instantclient_<ver> to /usr/share/oracle/instantclient/lib/
mv /usr/share/oracle/instantclient/`ls -l /usr/share/oracle/instantclient/ | grep instantclient_ | awk '{print $9}'`/lib* /usr/share/oracle/instantclient/lib/

# Move rest of the files to /usr/share/oracle/instantclient/
mv /usr/share/oracle/instantclient/`ls -l /usr/share/oracle/instantclient/ | grep instantclient_ | awk '{print $9}'`/* /usr/share/oracle/instantclient/

# Create symbolic links. Remember to edit version numbers as necessary
cd /usr/share/oracle/instantclient/lib
ln -s libclntsh.so.12.1 libclntsh.so
ln -s libocci.so.12.1 libocci.so

- Set $ORACLE_HOME and $LD_LIBRARY_PATH:
export ORACLE_HOME=/usr/share/oracle/instantclient
export LD_LIBRARY_PATH=$LD_LIBRARY_PATH:$ORACLE_HOME
Apply Temporary Workaround for Oracle 12 Client
Update the cx_Oracle package in your native Python environment and copy it to Hue's Python environment.
- Install gcc and Python development tools:
## CentOS/RHEL (yum), SLES (zypper), Ubuntu/Debian (apt-get)
yum install -y python-setuptools python-devel gcc
#zypper install -y python-setuptools python-devel gcc
#apt-get install -y python-setuptools python-dev gcc
- Install pip:
easy_install pip
- Install cx_Oracle. Ensure that ORACLE_HOME and $LB_LIBRARY_PATH are properly set so that
pip knows which version to install.
echo $ORACLE_HOME $LD_LIBRARY_PATH
pip install cx_Oracle==5.2.1
- Get the version of the new cx_Oracle package:
- CentOS/RHEL and SLES:
ls /usr/lib64/python2.7/site-packages/cx_Oracle*
- Ubuntu/Debian:
ls /usr/local/lib/python2.7/dist-packages/cx_Oracle*
- CentOS/RHEL and SLES:
- If this is a New CDH Installation, stop here to run the first 5 or 6 steps of the Cloudera Manager Installation Wizard (packages=5, parcels=6). Do not go past Cluster Installation.
- Navigate to Hue's python environment, $HUE_HOME/build/env/lib/<python version>/site-packages.
- CDH Parcel installation:
cd /opt/cloudera/parcels/`ls -l /opt/cloudera/parcels | grep CDH | tail -1 | awk '{print $9}'`/lib/hue/build/env/lib/python2.7/site-packages - CDH package installation:
cd /usr/lib/hue/build/env/lib/python2.7/site-packages
- CDH Parcel installation:
- Move the existing cx_Oracle file:
mv cx_Oracle-5.2.1-py2.7-linux-x86_64.egg cxfoo
- Copy the new cx_Oracle module to Hue's python environment. The version can change:
- CentOS/RHEL and SLES:
cp -a /usr/lib64/python2.7/site-packages/cx_Oracle-5.3-py2.7.egg-info .
- Ubuntu/Debian
cp -a /usr/local/lib/python2.7/dist-packages/cx_Oracle-5.3.egg-info .
- CentOS/RHEL and SLES:
Connect Hue Service to Oracle
You can connect Hue to your Oracle database while installing CDH (and Hue) or with an existing installation. With existing CDH installations, you can connect and restart Hue, without saving the data in your current database, or you can migrate the old data into Oracle.
Continue reading:
New CDH Installation
See Cloudera Installation Guide to install Cloudera Manager (and its Installation Wizard), which you will use here to install CDH and the Oracle client.
- Open the Cloudera Manager Admin Console and run the Cloudera Manager Installation Wizard to install CDH (and Hue). The URL for Cloudera Manager is: http://<cm server hostname>:7180
- Stop at the end of Cluster Installation to copy the latest cx_Oracle package into Hue's Python environment.

- Stop at Database Setup to set connection properties (Cluster Setup, step 3).
- Select Use Custom Database.
- Under Hue, set the connection properties to the Oracle database.
Database Hostname (and port): <fqdn of host with Oracle server>:1521
Database Type (or engine): Oracle
Database SID (or name): orcl
Database Username: hue
Database Password: <hue database password>
- Click Test Connection and click Continue when successful.

- Continue with the installation and click Finish to complete.
- Add support for a multi-threaded environment:
- Go to .
- Filter by Category, Hue-service and Scope, Advanced.
- Add support for a multi-threaded environment by setting Hue Service Advanced Configuration Snippet (Safety Valve) for hue_safety_valve.ini:
[desktop] [[database]] options={"threaded":true} - Click Save Changes.
- Restart the Hue service: select and click Restart.
- Log on to Hue by clicking Hue Web UI.
Existing CDH Installation
If you are not migrating the current (or old) database, simply connect to your new Oracle database and restart Hue. See Connect Hue to an External Database.
- [migration only] Stop Hue Service
- In Cloudera Manager, navigate to .
- Select .
- [migration only] Dump Current Database
- Select .
- Click Dump Database. The file is written to /tmp/hue_database_dump.json on the host of the Hue server.
- Log on to the host of the Hue server in a command-line terminal.
- Edit /tmp/hue_database_dump.json by removing all objects with useradmin.userprofile in the model field. For example:
# Count number of objects
grep -c useradmin.userprofile /tmp/hue_database_dump.json
vi /tmp/hue_database_dump.json
{
  "pk": 1,
  "model": "useradmin.userprofile",
  "fields": {
    "last_activity": "2016-10-03T10:06:13",
    "creation_method": "HUE",
    "first_login": false,
    "user": 1,
    "home_directory": "/user/admin"
  }
},
{
  "pk": 2,
  "model": "useradmin.userprofile",
  "fields": {
    "last_activity": "2016-10-03T10:27:10",
    "creation_method": "HUE",
    "first_login": false,
    "user": 2,
    "home_directory": "/user/alice"
  }
},
- Connect to New Database
- Configure Database connections: Go to , filter by
Database, set properties, and click Save Changes:
Hue Database Type (or engine): Oracle
Hue Database Hostname: <fqdn of host with Oracle server>
Hue Database Port: 1521
Hue Database Username: hue
Hue Database Password: <hue database password>
Hue Database Name (or SID): orcl
- Add support for a multi-threaded environment: Filter by Hue-service, set Hue Service Advanced Configuration Snippet (Safety
Valve) for hue_safety_valve.ini, and click Save Changes:
[desktop]
[[database]]
options={"threaded":true}
- Configure Database connections: Go to , filter by
Database, set properties, and click Save Changes:
- [migration only] Synchronize New Database
- Select
- Click Synchronize Database.
- [migration only] Load Data from Old Database
sqlplus hue/<hue_password> < delete_from_tables.ddl
- Re/Start Hue service
- Navigate to .
- Select , and click Start.
- Click Hue Web UI to log on to Hue with a custom Oracle database.